Thursday, June 30, 2011

Prayer Flags

Back to some fabric and stitch. I was inspired to do a couple of Prayer Flags by Jane LaFazio, who told me and the other Sketchbook Challenge bloggers about a Prayer Flag Project initiated by Vivika DeNegre, a fabulous fiber artist. I love the idea of prayer flags as a format for artistic expression, as well as their original purpose - to spread blessings on the wind.

Here are my two prayer flags hanging over the brook that flows just behind my studio:


And here they are separately:


I used acrylic paint on muslin, and employed the "resist and water" techniques demonstrated here. I collage on the fabric with painted/textured deli paper, as demonstrated here. And, of course, used some of my scribble painted papers. I did some simple machine stitching, and sewed beads on by hand. Each flag is only 5"x8". Check out the Prayer Flag Project, and create your own!

Tuesday, June 28, 2011

More Pictures from Guilford

Here are a few more pictures from the Scribble Collage workshop at the Guilford Art Center in Guilford, CT:

Sharon's papers:


A demonstration:


Alice applying a second color of paint:

Papers on the lawn:

Doreen's collages:

Diane's collages (I hope she will scan these and post on her blog, so that we can see each piece individually):


Cathy's collages:


Alice's collages (this back-lighting does not do them justice):


Sharon's and Diane's collages:


Mary's collages (Mary LOVES bright colors!):


We did stain tissue papers, but nobody got any pictures of that process. We did use the tissue papers in our collages, though.

I will be teaching Scribble Collage again at Art Unraveled on August 8, and at Art and Soul on September 29. I'm also teaching a shorter version called "Scribble Paint" at Art and Soul on the evening of September 29. Hope you can be there!

Sunday, June 26, 2011

Greetings from Guilford!

I am having such a great time at the Guilford Art Center in Guilford CT! What a fabulous group we have! And even though some acrylic medium spilled all over my camera in transit, I am happily able to post pix because one of the participants, Cathy Farrell, kindly took photos and e-mailed them to me last night. What a gal!! So here are a few photos of just a fraction of the papers we painted yesterday:


We painted on Cheap Drawing Paper, on deli paper, and then we stained tissue papers, which will be dry this morning. We will learn one or two more techniques today, and then focus on making collage compositions using our papers. Sharon Gorberg is taking more pix, and will e-mail them to me soon so I can post even more tomorrow. I'll also scan some of the individual papers to give you a better look.

I am delighted to have Diane Wright in my class this weekend. She is a fabulous art quilter (check out her blog!!), introduced to me by Vivika DeNegre, whom I heard about through Jane LaFazio, one of my Sketchbook Challenge sisters! LOVE this networking thing! More about Vivika and company in a later post. She has an interesting project I want to show you. Stay tuned.

Friday, June 24, 2011

Video Tutorial on Resist and Water Technique

Thanks for all your feedback and commentary on my Solstice Series. I am happy to hear so many of you are interested in a tutorial on this technique. I'll post the video first, and then a few finished pieces and pieces in progress.


Here is the piece demonstrated in the video. It is just the beginning of a piece:


A piece from my post the other day, only developed a little further:


This one makes use of the same technique, plus the gooey stuff in the middle, which is a demonstration for another time.


And one more in this Solstice Series:


FYI: My online workshop "Unlocking the Secrets of Color" is still open for registration. It begins June 29. The same is true for "Keys to Dynamic Composition". I have great groups in both workshops already signed up, and if you care to join either one, click here.

Thanks for visiting!

Tuesday, June 21, 2011

Solstice Series

I just started a series that I am calling "Solstice Series", only because it is Summer Solstice. Since I just began this yesterday, I don't really know if any of them are finished yet. They'll have to sit for a while, but I thought I'd share some of my process with you.

I started this series with a basic composition in mind: vertical stripes, and some kind of circle. Only this one has the circle so far:


But this one is getting there. I don't think this one is finished yet:


This one may be finished. At this point I don't think it needs the circle. It turns out to be more about the stripes, shapes, scribbles, and textures:

I am liking the depth of layers here, but not sure where it is going next:

Here are a couple of "stage 1's" in this series. I'm using Nickle-Azo Yellow, Quinacridone Gold, and a couple of reds.

The pattern underneath the color is created by squeezing out acrylic medium with a scribble motion, then placing another paper over it, face down. So you get two sheets of paper with the scribbled design. Like a print. I let that dry, then use a credit card to scrape on the paint.

I create a little more texture like this:
  1. Lay down one color of paint (unevenly) and let it dry.
  2. Apply another color over it.
  3. When the second coat is just tacky, use a plastic pipette or eye dropper to apply water in drops or scribbled lines.
  4. Wait until the paint is dry and the water has soaked in a bit, and then blot with a paper towel.
Maybe I'll do a video tutorial on this if anyone is interested. It's a fun way to build up texture. Thanks for visiting! And happy Solstice!!

Friday, June 17, 2011

Friday Tutorial - Removing Paint with Alcohol

I have been in the encaustics obsessive mode this week, but did manage to make one little video tutorial. This is an edited version of a video that is included in my upcoming online class, Keys to Dynamic Composition.

If you have discarded or abandoned pieces of art done in acrylic paint, one way to resurrect them as backgrounds for new work is to remove some of the paint using regular rubbing alcohol. A piece can become particularly interesting if you have several layers of paint and collage to work with.


After removing some of the paint, you can apply gesso, more paint, collage, whatever you like, gradually building up layers of texture, color, and imagery. Here is the piece I worked on in the video:


I eventually cut it into a square and did a collage shape study on it:


This kind of study using cut out shapes is also in the online composition workshop. I did notice that the alcohol does not remove gloss gel or medium. I wonder why not.... But this means that you could prime your paper with gloss gel/medium, apply layers of acrylic paint, use alcohol to remove some of the paint, and the medium would protect the paper.

Meanwhile, stay tuned for more developments in encaustics.... I'm trying out different materials to create collage papers, and also some new (new to me) ways of creating texture. Thanks for visiting!

Tuesday, June 14, 2011

Encaustic Collage Experiments

I am quite revved up about encaustics, having had a fabulously stimulating time at the Fifth Annual Encaustics Conference in Provincetown, MA the other weekend. I have been experimenting with various techniques I learned at the conference, and corresponding with artists I met there.
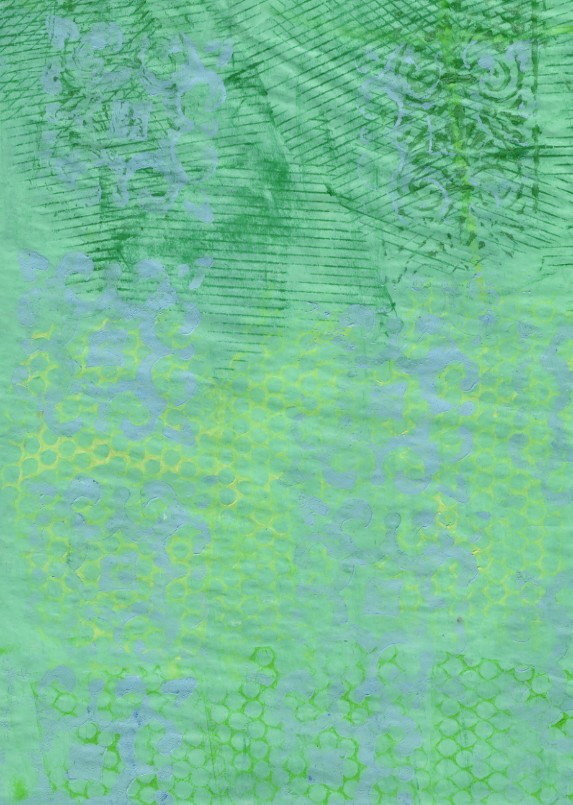
Above is my first encaustic "Scribble Collage" experiment.

I've also been experimenting with a way to apply my Scribble Collage approach to this exciting medium: painting tissue papers, then using them for collage. As acrylics are not compatible with encaustic, I tried painting papers using oil paint mixed with cold wax medium, and let them dry for a few days.

I scraped the paint/wax on using a credit card, and then did texture rubbings and transfers.

I also scribbled on the papers with oil sticks and pigment sticks (which are the same thing) and oil pastels (which differ from the above in that they contain no drying agents).
I don't know if this combination of oil media and encaustics is safe and durable yet, and I have sent out feelers to determine the best way to approach this technique and will share more as I learn.

This piece is done on unryu (say: un-RYE-you), a tissue-weight paper with a distinctive fibrous texture:

Meanwhile, if any of you have suggestions, comments, or questions, please e-mail me or leave a comment on this post. DO NOT TRY THIS AT HOME until I get the goods on safety! There may be a better medium than cold wax to do this process. Read this for more info on cold wax. I'm trying to find out if the solvents in the cold wax evaporate sufficiently during drying to be compatible with this process.
THANKS for visiting!

Friday, June 10, 2011

Scrribble Collage at Guilford Art Center

I am teaching a two-day Scribble Collage workshop at Guilford Art Center on June 25 and 26th in Guilford, CT. This time I am doing it a little differently. We will spend the first morning making stained tissue papers:


Which are beautifully luminous:


We will make patterns and textures on the stained papers:


And glitz them up with shimmer mists and metallic paints.

We will also paint light weight drawing papers, newspaper, and printed papers to make a big yummy stash of collage materials.


On the second day we will focus on creating collage compositions, working in small series.


I got such a strong response to my "Staining Papers" posts from a few months ago, that I decided to include it in this workshop. In my own work I use a lot of stained tissue paper in conjunction with my painted drawing papers. Thanks for visiting!

Monday, June 6, 2011

Encaustic Conference

Hi Everyone,
I've been away for a few days at the Fifth Annual Encaustic Conference in Provincetown, MA, founded and organized by Joanne Mattera. I saw demonstrations of encaustic monotypes, photographic and other transfer techniques, using masks and stencils, using pigments with shellac and igniting it on the encaustic surface, using handmade paper substrates for encaustic, and more. I was also thrilled to see the work of lots and lots of conference-attendees, who set up displays in their rooms on Sunday morning. Here are a few links to encaustic artists whose work I'd like to share. This is just a sampling. Check out the blog for more info, links, and suppliers.

David A. Clark


Binnie Birstein

Cherie Mittenthal

Cherie was responsible for bringing the conference to Provincetown, and is the executive director of Truro Center for the Arts at Castle Hill. She is represented by Kobalt Gallery in P'town, which hosted a show of encaustic work in conjunction to the conference.

Linda Womack
Jane Allen Nodine
Nancy Natale
Nancy also has a blog on which she has posted fabulous pictures of the conference.
I could go on and on, but I'll leave you with this. Thanks for visiting!